Easy Toilet Roll Crafts: Make an Easter Bunny
I was thinking about toilet roll crafts and how I could come up with an Easter project. So, I started cutting one up with a vague idea, which became an Easter bunny that could hold an egg in its back.
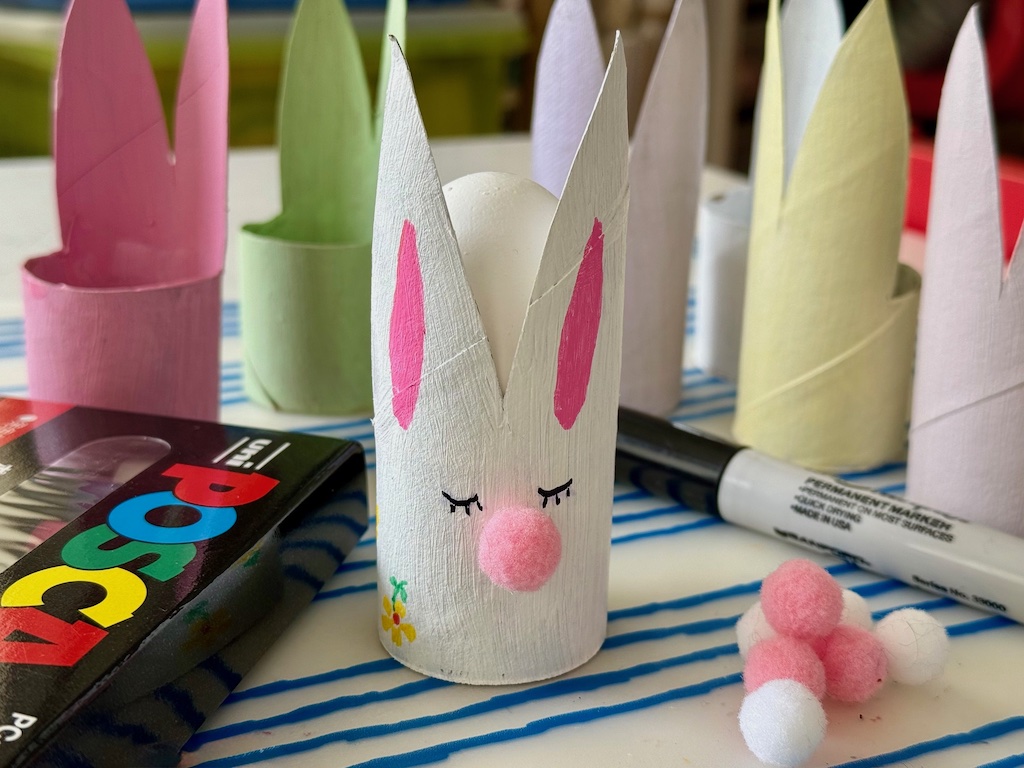
Here’s my prototype.
Well and good. But to make the bunny more symmetrical and make it duplicatable, I needed to make a pattern.
How to Make an Easter Bunny from a Toilet Roll
Materials Needed for Each Bunny
- Bunny pattern made from 1 toilet paper roll (see below)
- 1 toilet paper roll
- Acrylic paints in pastel colors
- Fine point black Sharpie pen
- Color markers
- Small (1/2-inch) pink and white pompoms
Tools Needed
- Ruler
- Pencil
- Small, sharp scissors
- Low temperature glue gun
Make your Bunny Pattern
So, here’s how to make your pattern. Steps below correspond to the illustration numbers.
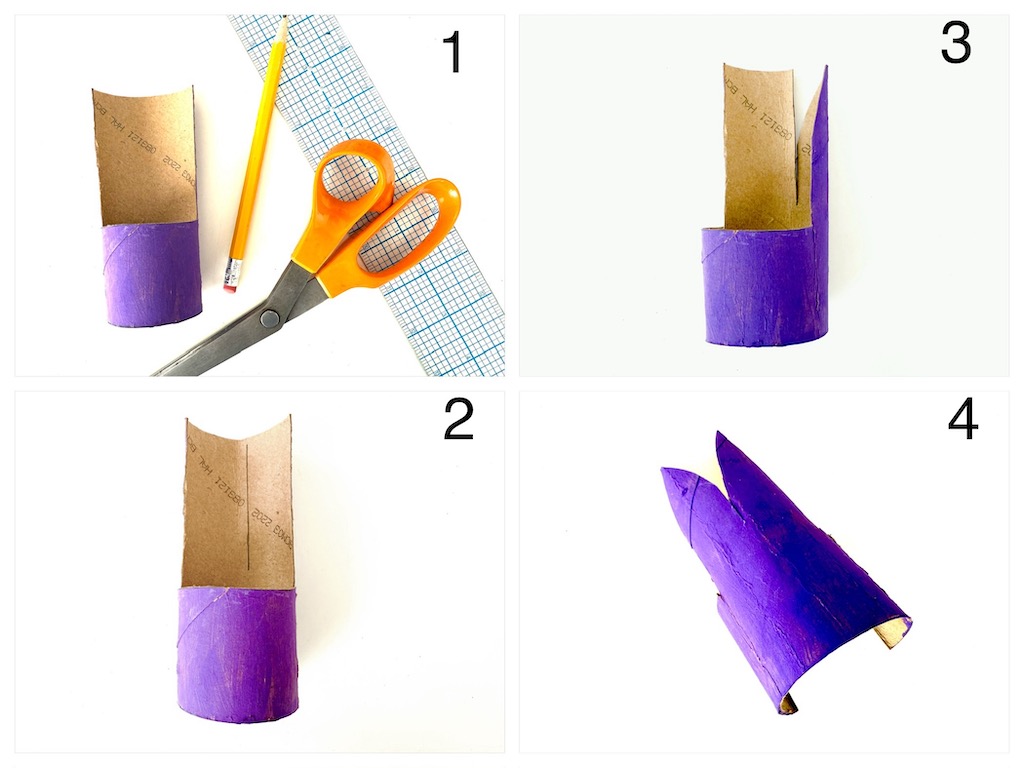
- The bunny has a front side and a back side. Make the back side first by folding the toilet paper roll in half, lengthwise. Cut along each fold, down to about 2/3 of the length of the roll, leaving 1/3 for the bunny’s backside. Fold back the excess cardboard and cut across the fold, as shown.
- To make the ears, you want them to be equal in size, so first, measure between the two cut sides of the front of the bunny and draw a line to mark the middle.
- Cut along the line, stopping when you reach about 1/3 from the bottom. This cut is the divider between the two ears. Now bring one outer edge of the toilet paper roll to the cut line and make a fold. Cut half the shape of the bunny ear from the side opposite the fold. Now when you open the fold, you have a symmetrical bunny ear. Repeat for the second ear.
- Cut through the middle of the back of the bunny to flatten out and use as a pattern.

Make your Bunny
Place your pattern over a second toilet paper roll and trace the outlines with a pencil. Cut along the outlines with scissors. Paint the bunny, inside and out.
Color inside the ear in pink and draw features with a black Sharpie and/or markers. For cute bunny eyes, check this page for ideas. You can decorate your bunny by drawing some dots or flowers.
Next, glue on a pink pompom for the bunny’s nose and a white pompom for the tail. If you don’t have a glue gun, you can use white school glue like Elmer’s but you have to hold the pompom in place for awhile until the glue sets.
Tip: it’s easier for the pompom to adhere if you snip off a little part of it to make a flat surface for the glue.
How to Use Your Bunny
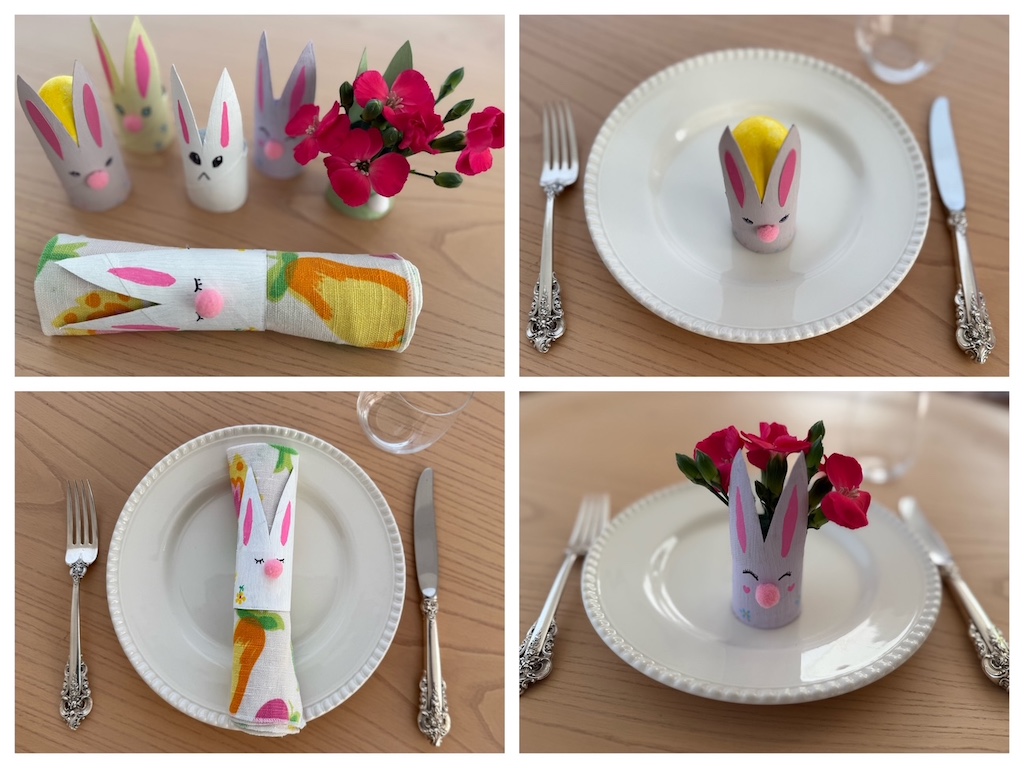
- Napkin ring: roll a napkin and thread it through your bunny; you could write each guest’s name on the bunny so it does double duty as a place card.
- Party favor: fill each bunny cavity with a large chocolate egg or a decorated Easter egg and set at each place setting.
- Flower vase: wedge floral foam into half a plastic egg. Add as much water as can be absorbed by the foam, put the half egg in the bunny, and arrange small flowers in the foam. (If you have a table or tablecloth that can be ruined by water, cover the holes of the plastic egg from the inside, with tape first, to prevent drips.) See how to use floral foam here.
- Table centerpiece: group some egg-filled bunnies around a spring flower arrangement or use them to surround a bowlful of Easter eggs or Mexican confetti eggs.
- Easter basket filler: Set a plastic Easter egg filled with small candies or toys into a bunny and add to an Easter basket.
How Kids can Help
Older children can make the bunnies after you’ve created the pattern. For younger children, cut out the bunnies and have them paint and decorate them. Or, paint the bunnies in advance and just get the grandkids to decorate them.

Sign Up to Get Grandma’s Favorite Recipes–Free!
Sign up here for my email newsletter. Every Wednesday, I’ll give you a new idea for an activity or insight to nurture the little ones in your life. And once you subscribe, I’ll send you a link so you can download your set of quick and easy recipes as my thanks to you.